New website and hosting

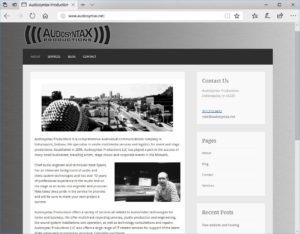
www.audiosyntax.net

It’s been several years since I’ve updated the site so I decided to take some time this winter to do some long overdue maintenance. I also found it was a perfect opportunity for me to switch hosting providers. I have multiple websites and servers that I manage both for myself and clients so ultimately I was attempting to consolidate and get everything in one spot. You might have already noticed that I’ve now added a blog section to the new website. I’ll be trying to blog as much as I can about everything technology related. I would really like to have an ongoing list of tech-tips and things that I find useful in the industry that will help the everyday user. I also plan to go into details about my hosting and wordpress move along with steps on how you can do the same. Check back in the near future for more blogs (hopefully)!

What’s the Difference Between 2.4 and 5-GHz WiFi?

Please note this post is about the “5GHz” radio frequency and not the same as the latest telecom advancements known as “5G” or “5th generation

Transmission Speed

2.4G and 5G refer to two different radio wave “bands” that Wi-Fi can use for its signal. The biggest difference between the two is speed. Under ideal conditions, 2.4 GHz Wi-Fi will support up to 450 Mbps or 600 Mbps, depending on the model of router. The latest 5 GHz Wi-Fi will support up to 1300 Mbps in optimal conditions. Of course, the speed is all determined by many factors such as type of router and cabling you are using as well as the implemented standard that you are using on your end device such as 802.11g or 11n.

2.4 GHz

The 2.4 GHz band is a crowded place because it’s used by more than just Wi-Fi. Old cordless phones, garage door openers, baby monitors, walkie-talkies and other devices all use the 2.4 GHz band. The longer waves used by the 2.4 GHz band are better suited to longer ranges and transmission through walls and solid objects. So it’s arguably better if you need better range on your devices or you have a lot of walls or other objects in the areas where you need coverage. However, because so many devices use the 2.4 GHz band, the resulting congestion can cause dropped connections and slower-than-expected speeds.

5 GHz

The 5 GHz band overall sees much less use so in turn it is much less congested. You will likely get a more stable connection due to less traffic in this radio spectrum. You’ll also benefit from higher speeds as higher data transmissions are supported..On the other hand, the shorter waves used by the 5 GHz band makes it less able to penetrate walls and solid objects. It also has a shorter transmission range which is one of the reasons the spectrum sees less traffic. The downside is some manufactures have been slow at implementing 5G standards into their new hardware. Also, lower end home routers are not implementing or have it turned off by default out of the box.

Audio Over IP Basics

Audio over IP is nothing more than audio that is being sent over the internet. The digital audio file is encapsulated in a packet and it’s data is sent over the web just like a picture or an email. The end user is usually using a similar system which decodes the packet and plays back the audio in near real time. You might use this technology every day using FaceTime or Skype.

Audio over IP networks (AOIP) are nothing new but we are finally starting to see some major improvements with these distribution mediums. The technology replaced aging ISDN networks which were used many years prior by studios and radio stations. The infrastructure usually consisted of multiple telephone lines to create a high bandwidth network. The cost for hardware and service was atrocious. Both systems are capable of providing high quality audio with very little latency. Depending on the codec and the system being used it possible to get near original quality of a singer in Boston played back in real time to an engineer in Mumbai. Think of a very high qaulity phone call suitable for recording or broadcasting.

AOIP and VOIP technologies are steadily growing more reliable so it’s only a matter of time before manufactures start pushing these technologies as the standard to consumer markets. The major factors of audio over IP is quality and latency. Keep in mind that AOIP when used in live events, broadcast, and studio is far different than listening to your favorite artist over Spotify. Live engineers depend on near zero latency and high bandwidth which means buffering is not an option. Even when used in video conferencing it is incredibly annoying when the call is dropping in and out or there is a huge delay.

We’re still a long ways away from determining one standard that we will see as default in hardware including mixers, cameras, phones, conferencing systems and studios. The industry is still currenly dominated by a proprietary market where hardware manufactures usually require their technology be used on both ends of the transaction.

Hearing Assist in Sound Systems

You’ll find a hearing assist system in almost any venue nowadays and quality and ease of use vary by style. Hearing assistance in public address systems are a must and it’s important to understand the different types of setups you might encounter.

Hearing assist systems are usually a separate piece of hardware that is separate from the mixer or amplifiers. It can be fed with the same mix as the amplifiers or a completely dedicated mix which can be compressed and EQ’d for optimal clarity. Hearing system mixes should include not only the microphones present in the room but also any computer playback and teleconference audio that migh be used. Let’s review the different types of hearing assist systems currently available.

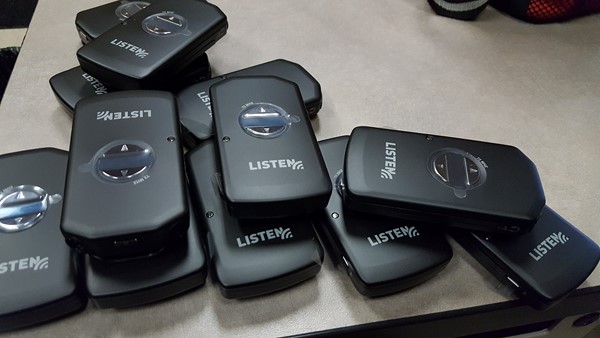
Receivers – Included with all systems and customized to pickup whatever audio delivery method the venue uses. Devices are usually handed out to users upon request and range in size from a credit card to a necklace or lanyard worn by the individual. Receivers will include a 3.5mm audio jack for any earbuds or dongles for integration with hearing aids.

RF (Radio Frequency) – Same technology as a two-way radio or baby monitor and has been dependable for years. The system uses a small transmitter with antennas to transmit RF signals to receiver devices given to the end users. RF systems are generally the cheapest but systems range in price depending on the features. Some venues transmit multiple channels of RF for different languages or different rooms and this can easily be accomplished. Common frequencies found can be 2.4GHz, 5Ghz, and 72MHz just like wireless microphones and IEM systems.

IR (Infrared) – Same concept as RF only uses IR radiators to flood infrared light into a space for receivers worn by the user. It has better security than RF because the infrared can be contained to one room and cannot leak through walls. Each room in facility will need it’s own IR radiator and cabling which can add to cost.

Induction Loop (T-Coil)  – Hearing Loop in the newest technology and uses a magnetic field from the building to transmit audio to a receiver or T-Coil compatible hearing aid. These systems use copper wire installed in the floor much like a heated flooring system and can span an entire venue. For obvious reasons this is usually only done for new construction or remodel and can also be the most expensive. T-Coil ready hearing aids are becoming more popular and users prefer the ability to connect to a system without any additional hardware. Induction technology seems to be the favorite as long as a well calibrated system is in place.  

Base-2 Methodology Capacity Reporting

You may have noticed that there is usually a discrepancy between the capacity listed on a hard drive label and the capacity reported by the computer. For instance, I attach a 250 GB hard drive into my computer and it shows as 232.74 GB available. Some of that has been lost in the formatting of the files system, but not all of it!

This can be explained with simple mathematics and the differences between base-10 and binary base-2 counting methods. Computers and operating systems typically run base-2 where a gigabyte is 1024 megabytes and a megabyte is 1024 kilobytes. Drive manufactures base their labeling and marketing on the base-10 methodology which means a gigabyte is 1000 megabytes and a megabyte is 1000 kilobytes.

Storage capacity reporting

This wasn’t really a problem until the mid 2000’s when hard drive manufactures really started to increase to availability of large capacity discs. Every gigabyte added to a hard drive caused a discrepancy of 73,741,824 bytes. Nowadays it is typical for the manufactures to overshoot on the number of bytes they can fit on a drive which ends up giving you back several gigabytes.


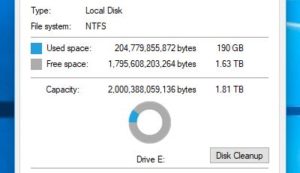
Windows 10 and Apple operating systems since Snow Leopard make up for the difference in numbers by calculating both readings for you and typically gives you the easier to read base-10 number first.On windows 10 in the disc properties you can see  the number given in both base-2 and base-10 counting systems. In the picture above you can see that my PC is reporting my 2TB hard-drive as having just over 2 trillion bytes. You can also see the discrepancy between the actually bytes given and the GB reading. With cloud computing we are typically only given the base-10 value which ends up being fine we we typically deal with gigabyte and terabyte storage plans.

T568A and T568B Wiring Standards

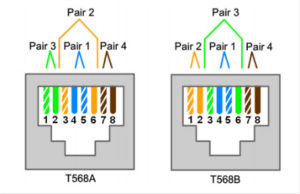
Copper based, twisted pair ethernet terminations come in 2 different flavors recognized by ANSI, TIA and EIA. T568A and T568B. You may have heard the term crossover cable which is a cable terminated with both standards on the 2 opposing ends. All “normal” cables have the same termination on both ends also known as “1 to1”. T568B tends to be more widely used in normal twisted pair cable manufacturing than T568A. Although there is no apparent performance difference between the two there is still some debating in the industry as to which one is better.

Twisted Pair Pin Configurations

The only difference between T568A and T568B wiring standards is the orientation of the green and orange wire pairs. You can see in the attached image that pins 1 and 2 swap orientation with pin 3 and 6. Some older equipment uses standard “A” which might require you to use a crossover cable while using a new computer. Crossovers are also useful if connecting 2 computers together without a switch in between. Nowadays there is rarely a need for crossover because gigabit switches and NIC cards started auto detecting the pin configuration and started doing the pin reconfiguration within the electronic chip electronically. This technology is called auto-MDIX which stands for automatic medium-dependent interface crossover.

Things To Do Before Your Recording Session

Here is a quick list of things musicians can do before arriving at a studio session. Performing these tasks before you begin recording can save you valuable time and headaches in the studio. This is a list I compiled after seeing the same problems repeated over and over again. Although most of these apply to the recording studio, you may find that these are useful for live gigs as well. If you are headed to the studio and are bringing your own hard drive or files you should read this separate list specifically for transferring recording sessions between locations.

  • Put new strings on your guitar or bass a day or two prior to the recording session. Drummers are recommended to use new heads for recording session. Make sure you play with them for awhile to “break-in” the sound and ensure your are familiar with the new feel.
  • Guitar and bass players – bring a tuner. Drummers – bring a drum key. I have seen an hour wasted as a single tuner makes its way around the room. By the time it gets to the bass player, guitar lead #1 is already back out of tune. Each musician should have their own tuner.
  • Make sure all your equipment (amps, guitars, pedals, cords, drums, etc.) is in proper
    working order before the session begins. If you are getting a hum from your amp, squeak
    from your bass drum pedal, or your guitar cord has a short in it please get your gear fixed
    beforehand!
  • Bring extra batteries for your guitar/bass pedals and active instruments. Bring extra
    sets of strings, picks, and drum sticks. Most recording studios will have this stuff on hand but the price really adds up! 9-volt batteries and extra cables are a must for any musician gig bag.
  • Don’t forget your guitar and keyboard stands. Also, any power supplies for
    keyboards, guitar and bass FX processors.
  • Arrive to the studio early and account for load-in time. this will differ between studios and how they accurately bill for a session so talk to them first. At most studio the clock starts at the time the session was scheduled/booked so arriving early will give you time to set up your instruments and warm up your vocals. In cold or humid climate you should let your instruments acclimate to the studio environment
  • It is recommended to have your guitar or bass guitar’s intonation set up and general
    maintenance performed by a professional before entering the studio. This is just routine maintenance and to keep your instrument in top shape you should have it inspected annually.

Best Computer Shortcuts

Most keyboard shortcuts are under utilized by the average user. Using simple computer shortcuts in the workplace and home life can increase your productivity and cut back on the strain caused by repetitive motions. I have compiled a list below of my favorite most used shortcuts for Mac and PC. If you are using presenting you should check out my PowerPoint shortcuts list for smoother presentations.

PC

  • Ctrl+A

Highlight everything in the current folder, document, or page.

  • Ctrl+C

Copy the selected text, image, or item to the clipboard.

  • Ctrl+V

Paste contents of the clipboard into current program or window.

  • Ctrl+F

In most programs, this command opens up a search window (includes all browsers and most Office applications).

  • Ctrl+S

Save an open document, file, or webpage (most browsers and programs).

  • Ctrl+Z

Undo the last action performed (supported by most programs and browsers).

  • Ctrl+Tab

Move through currently opened windows.

  • Windows key+M

Minimize all opened windows.

  • Alt+F4

Close any opened/active windows app.

  • Ctrl+Shift+T (browser)

Reopen last closed browser tab.

  • Ctrl+D (browser)

Bookmark current browser webpage.

  • Ctrl+R (browser)

Refresh current webpage

  • Windows key+L

Lock your PC.


MAC

  • Command+C

Copy the selected text, image, or item to the clipboard.

  • Command+V

Paste contents of the clipboard into current program or window.

  • Command+F

In most programs, this command opens up a search window 

  • Command+Spacebar

Opens Sppotlight

  • Command+S

Save an open document, file.

  • Command+Z

Undo the last action performed.

  • Command+Tab

Move through currently opened windows.

  • Command+Option+M

Minimize all opened windows.

  • Ctrl+Shift+T (browser)

Reopen last closed browser tab.

  • Ctrl+D (browser)

Bookmark current browser webpage.

  • Ctrl+R (browser)

Refresh current webpage

  • Ctrl+Shift+Power Button

Lock your Mac.

  • Command+Option+Esc

Force Quit

  • Command+Shift+3

Screen shot


Correlation of File Size and Audio Quality

There was once a time when we really needed to pay attention to disc space and file size when it came to recording. Writing those log sheets is a thing of the past with the plethora of HD space now available at a relatively cheap price. However, I routinely look back on the correlation of file size and audio quality for various reasons. Usually when I begin a recording project I like to dedicate an entire hard drive to the band or project. Using the below  calculations I can generally determine the size of the hard drive needed to fit the project. Nowadays I tend to find myself always buying 2TB hard drives which will fulfill any project. If I waste the space, it doesn’t matter. Either way, these calculation tables are great for any engineer to have on hand.

All the calculations for high resolution audio below are for the Pulse Code Modulation audio format. Regularly referred to as PCM, it  commonly uses the file extensions .wav or .cda. There are quite a few other combinations of bits per sample and samples per second which may be used as well as a large number of containers and file extensions. Tables below refer to calculations based on the most common mono and stereo settings used by engineers. Calculations for MP3 files are based on the LAME audio encoding standards. They also include both left and right stereo channels because who the hell makes Mono MP3 files? But the again who records at an 64 Kbps? Kbps means “Kilobits per second” (1,000 bits per second) and KB means KiloBytes (1,000 Bytes). There are 8 bits in a byte. Note the uppercase “B” for bytes in “KB”. A lowercase “b” (Kb) would indicate bits.

The exact file size below will vary from system to system likely due to differences between binary and decimal counting systems (multiples of 2 versus multiples of 10). Check out my Base-2 Methodology post to get a better explanation of this confusing phenomenon. The file header information and ID3 tags (for MP3s) will have an effect on the numbers. Album cover art tends to affect these numbers the greatest as images can commonly be 2MB or larger. These numbers should be used as a “ballpark” amount.

Mono WAV (single channel)

Settings Bitrate File size
per second
File size
per minute
File size
per hour
16 bit, 44.1 KHz 705.6 Kbps 88.2 KB 5.292 MB 317.52 MB
16 bit, 48 KHz 768 Kbps 96 KB 5.750 MB 345.60 MB
24 bit, 44.1 KHz  1058 Kbps 132.3 KB  7.8 MB 465.1 MB
24 bit, 48 KHz 1,152 Kbps 144 KB 8.640 MB 518.40 MB
24 bit, 96 KHz 2,304 Kbps 288 KB 17.280 MB 1.0368 GB


Stereo WAV (dual channel)

Settings Bitrate File size
per second
File size
per minute
File size
per hour
16 bit, 44.1 KHz 1,411.2 Kbps 176.4 KB 10.584 MB 635.04 MB
16 bit, 48 KHz 1,536 Kbps 192 KB 11.520 MB 691.2 MB
24 bit, 44.1 KHz  2,117 Kbps  264.6 KB 15.5 MB 930.2 MB
24 bit, 48 KHz 2,304 Kbps 288 KB 17.28 MB 1.036 GB
24 bit, 96 KHz 4,608 Kbps 576 KB 34.56 MB 2.0736 GB


Stereo MP3 (dual channel)

Bitrate File size
per second
File size
per minute
File size
per hour
64 Kbps 8 KB 480 KB 28.8 MB
96 Kbps 12 KB 720 KB 43.2 MB
128 Kbps 16 KB 960 KB 57.6 MB
160 Kbps 20 KB 1.20 MB 72.0 MB
192 Kbps 24 KB 1.44 MB 86.4 MB
256 Kbps 32 KB 1.92 MB 115.2 MB
320 Kbps 40 KB 2.40 MB 144.0 MB

Understanding Microphone Polar Patterns

What are Polar Patterns?

Polar patterns describe how a microphone picks up sound. Specifically, it is a standardized measurement that describes the sensitivity of the microphone from all directions. The polar pattern is one of the most important specifications for a microphone and can be helpful determining the right microphone for the job as well as achieving optimal performance.

Each microphone has it’s own polar pattern which is unique to its design and characteristics. However, most polar patterns can be placed into 5 different categories of microphones. Although there are many other poplar pickup patterns found in microphones I will only cover what I feel is the most common and can still be applied to microphones that you might sometimes place in a different category of polar pattern. I’ll describe the five most common microphone polar patterns found in the industry today.

Omni-Direction

Omni microphone pick up from all directions equally. The pattern is usually represented by a full circle. Commonly found in lavalier and lapel microphones for TV and film as well as hi fidelity studio situations and measurement tools.

Bi-Directional

Bi-Directional microphones are also sometimes called figure 8 microphones. Sound pickup is equally sensitive in the front and back of the microphones. The sides of the microphone will generally have a high rejection of audio which makes this style of microphone perfect for precise application. The polar patter resembles an 8 and shows equal pickup on opposite poles of the microphone. Most ribbon microphones are bi-directional and almost only used exclusively in the recording studio environment.

Cardioid

The most common pickup pattern is undoubtedly the cardioid microphone. Strong presence in the front of the microphone with a -6db drop at 90 and 270 degrees respectively. This is an ideal pattern for any broad use microphone and can be used in any situation and has excellent gain before feedback. The polar pattern is represented by a heart shape and is one of the most common styles for microphones.

Super-Cardioid

These microphones usually have a specific use in film and TV. They are more directional than cardioid microphones but also pickup directly behind the microphone at 180 degrees while having a steep roll-off of sensitivity on the sides. Commonly found in shotgun microphones and the pattern tends to look like a mushroom.

Lobar

Lobar pattern is also commonly called shotgun pattern because you generally only see this polar pickup pattern in shotgun microphones. These microphones are as unidirectional as it gets and are intended to block as much background noise as possible. The polar pattern is represented by what looks like a stick and is much thinner than a figure 8 polar pattern.