- Find a quiet room with very little or no background noise. Having a quiet location is just as important as a good microphone. Following the below steps will also help mitigate issues if you find yourself in a noisy location.
- Sit in the center of the camera shot at a 90 degree angle for proper framing. This is also the optimal viewing angle for everyone on the call. Laptop pedestals are available you if are having trouble finding a way to elevate your laptop.
- Lighting is everything. Use as much as possible. Consider purchasing an aftermarket camera light if you find your home or office video location is too dark.
- Do not sit with windows behind you. The camera will auto adjust its iris on windows causing your face to become dark. This is a big problem with cheaper webcams and low model built in laptop cameras.
- Be aware of what is in your camera shot. Don’t let anything get in the shot that you don’t want everyone to see.
- Use headphones to listen to audio. This will ensure better audio quality for everyone on the call and minimize audio leaking back into microphone causing feedback or “echo”.
- If your headphones have a microphone, use it. These mics such as the ones that come with an iPhone are usually better than the ones built into your camera or computer screen. Built in cameras on laptops can easily pickup fan noise and other electronic sounds due to it’s close proximity to the machine.
- Keep your microphone muted during the call unless you are speaking. This is just courtesy and prevents the unnecessary noises from entering the call. This is also a must if you are not using headphones while joining the call.
- Hardwired internet connection will insure you have the speed and bandwidth you need. Although WiFi is perfectly capable of handling video conferencing it’s always nice to have the stability if introducing other forms of media such as screen share and videos.
- Perform a test connection BEFORE the meeting starts.
Author: Audio Nate
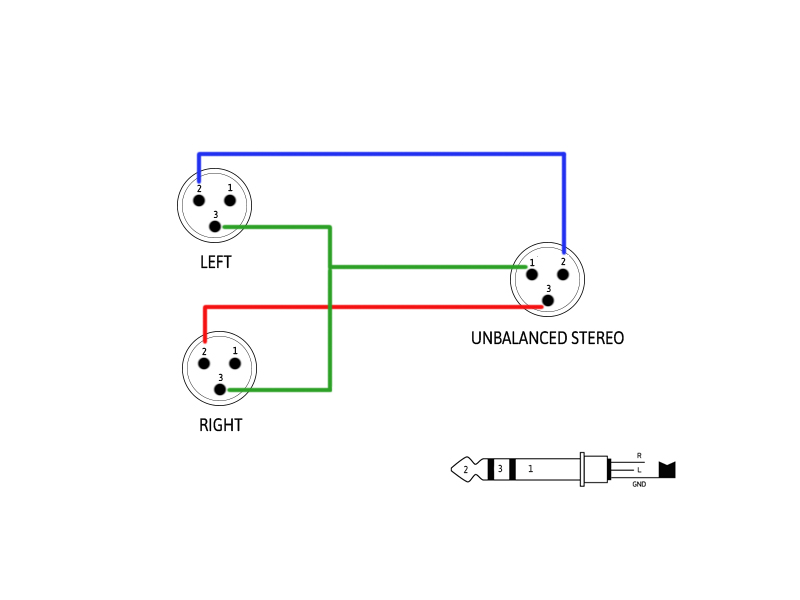
Unbalanced Stereo signals with a single XLR
Why do HDMI ports say “ARC”?
ARC stands for Audio return channel. This means that the HDMI port will accept audio/video as an input like normal but will additionally send audio back the opposite direction.
Pro Tools Integration with DANTE
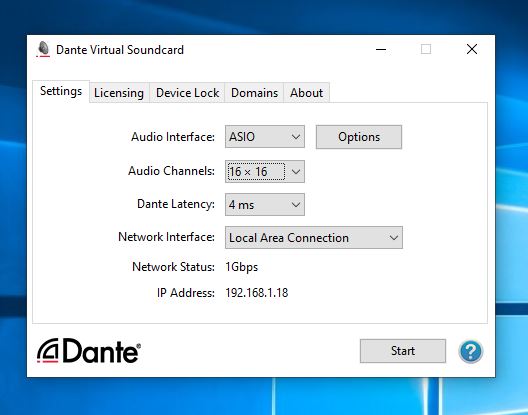
If there is already a Dante network in place then it’s easy to multi-track record and playback up to 64 channels with Pro tools or any other DAW. This can be accomplished with Dante Virtual Sound Card which will turn your computer (DAW) into a Date networked device using your existing Ethernet port. The software requires a license purchase but it is well worth it in my opinion.
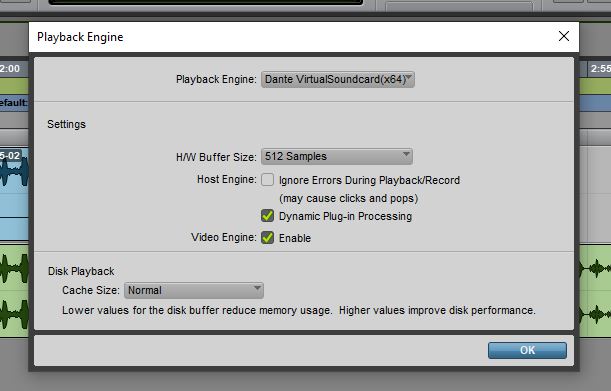
With the software running we can select it as our audio interface in Pro Tools under Hardware Configuration. The routing for the virtual sound card is handled by Audinate’s Dante Controller Software which is free. It can be used to control the audio routes and matrix of any Dante network. Use it to route audio in and out of your DAW from other devices on the network.
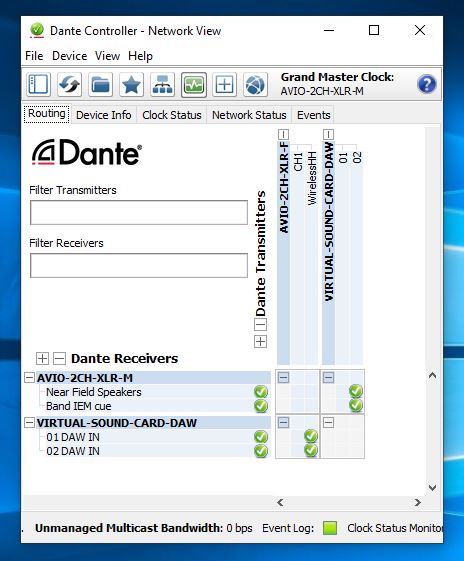
In ProTools set your track inputs to the Dante sources just as with any other audio interface. Also double check your ProTools Hardware IO settings which are different than Dante Controller IO settings. Selecting the default IO setup is adequate for most situations. You should now be able to record and playback respectably the active channels on the Dante network in and out of ProTools.
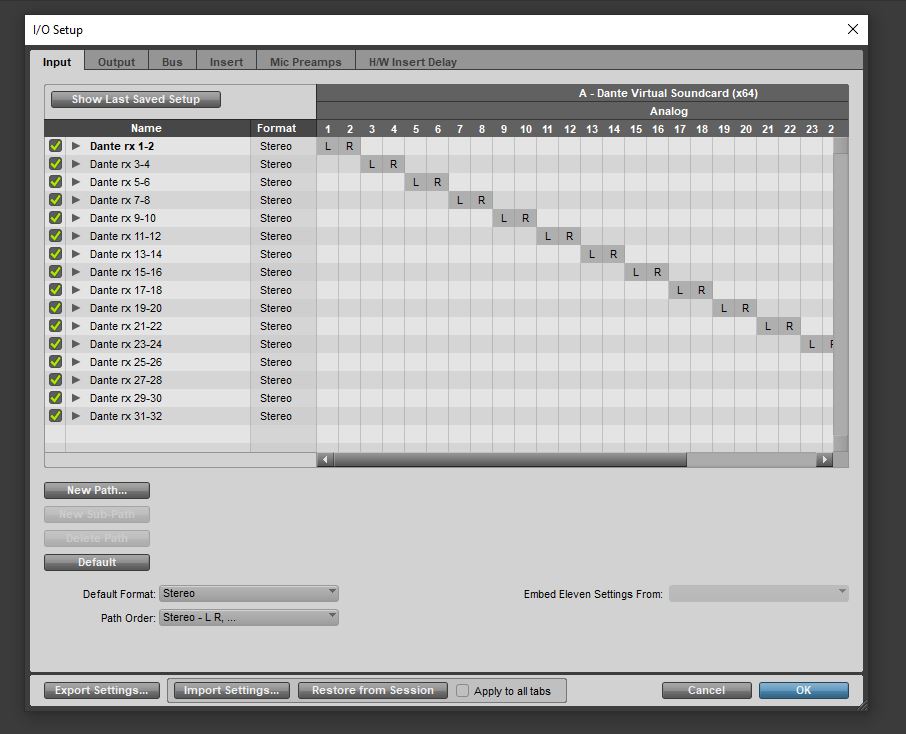
Connect Pro Tool to your DANTE network with the steps:
-Download, open and configure Dante Virtual Sound Card.
-On Windows Machines select ASIO Drivers for high performance DAWs or WDM drivers for consumer audio such as iTunes, VLC, WMP
-Choose number of input and outputs. Up to 64 channels are supported.
-Start Dante Virtual Sound Card
-In Dante Controller assign the necessary audio transmitter channels to the receiver channels of your virtual sound card device.
-Open Pro Tools and select Dante Virtual Sound Card as your hardware interface.
-Select source/destination inputs and outputs for individual tracks.
-Arm all tracks and record. You should see the Dante audio track being recorded into Pro Tools.
Avoiding Disaster with your iLok
I have recently updated this article to reflect updated policies by PACE regarding iLok’s “Zero Dowtime” and loss coverage programs.
What is an iLok?
iLok is a physical software authorization key in the form of a USB dongle. Software licenses are placed on the iLok and compatible programs (mostly professional media creation tools) look for the authorization upon startup. This was an early tool to help prevent software piracy.
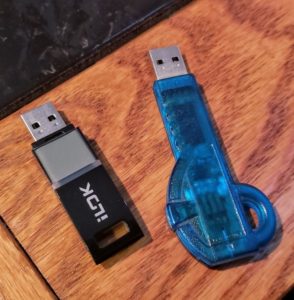
As with most piracy prevention tools it typically hurts the legitimate user more than the pirate. If your software key breaks, then you are out of luck until you can get a replacement shipped to you. PACE, the creators of iLok have done a great job in recent years making sure that customers always have access to their tools and software. There once was a time when a studio could be offline for weeks due to faulty or broken iLok keys, essentially turning production workstations into nothing more than a doorstop. It also use to be a lot harder to get the software manufactures to issue a replacement product key without having to re-purchase software. Thankfully, these are all things of the past.
Replacement
If you find yourself locked out you can be up and running within a few hours if you act quickly. You will need to submit a RMA with PACE for a replacement iLok on their website. The broken iLok will need to be shipped back and they will send you a replacement with loaded licenses. This process can take up to 12 business days due to the shipping process. You will also be required to purchase a new iLok and pay a RMA processing fee.
It’s great that we have the confidence that we get our licenses returned to us but what if you can’t afford to have the studio closed for two weeks? Luckily, the process has been streamlined over the years and if you are willing to shell out the money then you will be up and running in no time. At the time of submitting an RMA you will have the option to join the “Zero Down time” program. This is acts as an insurance policy for your iLok. The cost is $30 per year, per iLok. You will need to join the ZDT program and then additionally pay a $100 expediting fee to get you current broken iLok covered by your new insurance policy. Yes, that s right! Pay $100 and there are no “pre-existing conditions”.
After you have submitted RMA, joined ZTD, and paid the balance, PACE will deposit a 14 day temporary license into your account. This will allow you to authorize whatever software you need to run. A secondary iLok will be required to dump the temporary license onto so its always a good idea to have a spare iLok laying around. There are other ways around this such as using PACE’s software manager to authorize the computer itself but for simplicity sake it’s much easier just to have a spare iLok key in the event of an emergency. This 14 day temporary license will get you buy until you receive your new repaired iLok in the mail. At that time you will just switch back over to your primary iLok. More information on PACE’s zero dowtime program can be found here.
Prevention
There’s no doubt that the recovery process is much easier than it used to be but what can we do to prevent it from happening all together? One of the most common issues i see with broken iLoks is just from basic wear and tear from constantly removing in and out of USB slots. You can see this same type of damage happen with USB flash drives. Although the iLok is build more sturdy than your average thumb drive, it still won’t take much to render it useless.
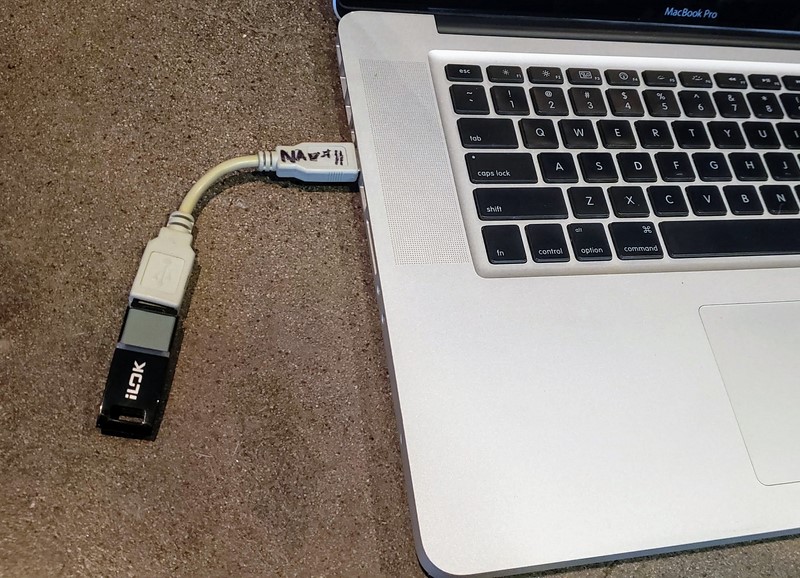
To prevent dongles such as iLok from breaking I always recommend adding a cheap USB pigtail to your device. A short 6″ USB extension cable can be added so that all the normal wear and tear will be placed on the pigtail rather than the USB drive itself. Having a pigtail also helps on laptops where USB drives are commonly broken off from being stuck in a rigid port. Male to Female extension cables can easily be found and it’s a worthy investment for under $10.
Get the Most From Your Google Brand Account
Google Brand accounts are a great way for organizations to keep their online presence consistent throughout the company. Individuals can jointly manage a Brand Account through their own Google Accounts. You won’t need a separate username or password. Your account can have multiple owners and managers. The best utilization of this is with a Company’s YouTube page. The brand account administrator can assign certain managers with read/write and editing access to the Company’s YouTube account. This is great when you have multiple staff members or interns that need to post content but you don’t necessarily want them having access to everything.
The Google Brand account also works with Google MyBusiness. administrators can assign someone in the organization to reply to Q&A that comes from the Google Business listing. The assigned “manager” will reply from his/her own account but will appear to the public as coming from the Branded company account.
The outcome can be viewed in this example YouTube video below. I used my brand account to assign my personal account as a content uploader. I then used my personal YouTube account to upload the video under the persona of my brand account. The uploaded video then appears on my Company Branded YouTube page and channel as if it were uploaded from that account directly.
Google has great tutorials on their help page which explain in detail the process that is needed for your particular device. Refer to google Help to setup your own Google Brand account or take note of the quick references below.
Create Brand Account
If you haven’t already, create an account for your business or brand.
- Google My Business – https://business.google.com/create
- YouTube – https://support.google.com/youtube/answer/1646861
View your Brand Accounts
- Go to the Google service you want to use, like plus.google.com.
- On the top right, select your profile image or initial.
- From the menu, choose the account you’d like to use.
- If your Brand Account does not appear, the service might not support Brand Accounts.
- Most phone apps can also switch between accounts
Change who manages an account
If you’re an owner of a Brand Account, you can add people to help manage the account. You also choose each person’s role to decide how much control they have over the account.
- Go to your Brand Accounts page in My Account.
- https://support.google.com/accounts/answer/7311601
Pro Tools Playback Engine
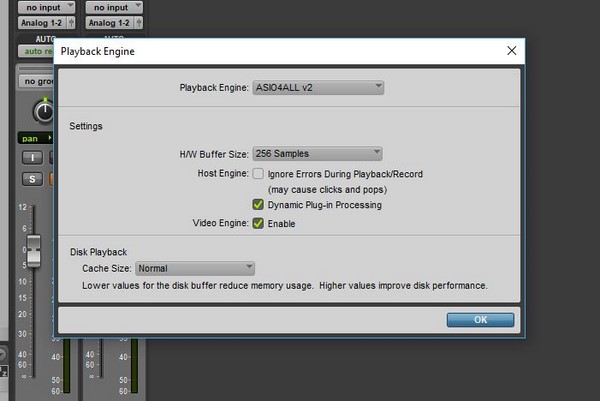
Small tweaks in Pro Tools playback engine can go a long way and help your system run smoother based on your current task. Incorrect settings in the playback engine can also cause errors and crashing during the recording or mixing process. So what setting should you be using? The answer is based on what you are trying to accomplish with your DAW. So, let’s look at the basic principles of buffer speeds and optimization to help you make a decision on what’s right for your situation.
Lower Buffer
Lowering your buffer speed while recording and tracking will help reduce audible latency. The downside of this is that you will be putting more strain on your computer’s CPU and will not be able to run many plugins. In general, it’s best practice to use minimal light-weight plugins to reduce processing requirements while tracking. Plugins can always be changed in the mix phase to a better sounding, more power hungry processor. If you are asking too much of your computer’s processor then you will get audible clicks and pops and possible even recording failure during the tracking process. Try out each setting and see what works best for your current situation. On Pro Tools LE rigs I typically don’t need to go any lower than 256 samples while multi-track recording 24 channels of audio.
Higher Buffer
Setting your buffer to the highest setting while monitoring playback and mixing will allow you to run more plugins and signal processing. There will now be slight delay when you start playback but this is a normal symptom of using a high buffer setting. The slight latency should not affect you in the mixing process but is obviously very hard to work with if you are recording instruments and have any intention for timing or rythym.
Change your Playback Engine settings in Pro Tools
- Click on the Setup menu at the top of your screen.
- Choose Playback Engine.
- In the buffer speed drop-down, select the speed that best fits your situation
Note: Choose a lower setting for tracking or a higher setting for mixing performance.
File Systems Formats
File Systems tell computers how to store and retrieve data. It does this by organizing data into different pieces and categorizing for fast retrieval. Different companies such Apple and Microsoft will use different file structures for their operating systems. Some Files systems are built for specific use such as cash registers. Others are built from and resemble standards put in place by the industry. Below is a list of some of the characteristics of the most common files systems found on personal computers. These File Systems are generally used with hard discs, optical storage, and flash media. It is important to understand file system structures especially when using systems and computers that must share data between different structure styles.
NTFS
NTFS (short for New Technology File System) is a modern, well-formed file system that is most commonly used by Windows Vista, 7 & 8. It has feature-rich, yet simple organization that allows it to be used on very large volumes. NTFS has the following properties:
- NTFS partitions can extend up to 16EB (about 16 million TB).
- Files stored to NTFS partitions can be as large as the partition.
- NTFS partitions occasionally become fragmented and should be defragmented often.
- NTFS partitions can be read from and written to by Windows and Linux systems and, can only be read from by Mac OS X systems (by default). Writing by Mac OS X systems can only be achieved through third party software by use of the NTFS-3G plugin.
It is recommended that NTFS be used for all media whose use is primarily with modern Windows systems. It should not be used for devices which need to be written to by Mac OS X systems or on media that is used in devices which are not compatible with NTFS.
FAT file system
The FAT (short for File Allocation Table) file system is a general purpose file system that is compatible with all major operating systems (Windows, Mac OS X, and Linux/Unix). It has relatively simple technical underpinnings, and was the default file system for all Windows operating systems prior to Windows 2000. Because of its overly simplistic structure, FAT suffers from issues such as over-fragmentation, file corruption, and limits to file names and size. This section refers to the FAT32 file system. Some early versions of Windows 95 used the FAT16 file system, which had even more technical issues and stricter limitations. It is recommended that FAT16 is never used on any modern media. The FAT file system has the following properties:
- FAT partitions cannot extend beyond 2TB.
- NOTE: Windows cannot format a disc larger than 32 GB to FAT32, but Mac OS X can.
- Files stored to a FAT partition cannot exceed larger than 4GB chucks.
- FAT partitions need to be defragmented often to maintain reasonable performance.
- FAT partitions larger than 32GB are generally not recommended as that amount of space starts to overwhelm FAT’s overly simplistic organization structure.
FAT is generally only used for devices with small capacity where portability between operating systems is paramount. When choosing a file system for a hard disk, FAT is not recommend unless you are using an older version of Windows.
exFAT file system
The exFAT (Extended File Allocation Table) is a Microsoft file system that is compatible with Windows and Mac OS 10.6+. It is also compatible with many media devices such as TVs and portable media players. exFAT has the following properties:
- exFAT partitions can extend up extremely large disc sizes. 512 TiB is the recommended maximum.
- Files up to 16 EiB can be stored on an exFAT partition.
- exFAT is not compatible with linux/Unix.
- exFAT partitions should be defragmented often.
- exFAT cannot pre-allocate disk space.
HFS+ file system
HFS (Hierarchical File System) Plus is a file system developed by Apple for Mac OS X. It is also referred to as Mac OS Extended. HFS Plus has the following properties:
- Maximum volume is 8 EB (about 8 million TB).
- Files stored to HFS+ partitions can be as large as the partition.
- Windows users can read HFS+ but not write.
- Drivers are available that allow Linux users to read and writer to HFS+ volumes.
EXT file system
The extended file system was created to be used with the Linux kernel. EXT 4 is the most recent version of EXT. Extended file systems have the following properties:
- EXT4 can support volumes up to 1 EiB.
- 16 TB maximum file size.
- Red Hat recommends using XFS (not EXT4) for volumes over 100 TB.
- EXT4 is backwards compatible with EXT2 and EXT3.
- EXT4 can pre-allocate disk space.
- By default, Windows and Mac OS cannot read EXT file systems.
Noise Cancellation and How it Works
Noise cancellation is quickly becoming a common feature for consumer headphones, office spaces, automobiles and even as sleeping aids. What exactly is noise cancellation and how does it work?
History
Prior to noise cancellation technology, engineers primarily relied on passive noise control practices with techniques like acoustical soundproofing, vacuum principals, and use of heavy bulky materials to physically block sound in listening environments. Although this method works, it isn’t very comfortable when applied to wearables and isn’t safe when you need to hear things like sirens while in a moving vehicle.
Active Noise Control
Today’s products offer noise cancellation using Active Noise Control practices. Utilizing ANC provides a much better listening environment and can provide clear detail at minimal volume levels. This is achieved using microphones to capture ambient noise outside of the listening environment. The processor then analyzes the waveform, flips it 180 degrees out of phase, and plays the sound back to you in your environment all within milliseconds. The delay is not enough for the human brain to understand so you will rarely realize it is happening. This process utilizes the phenomenon known as phase cancellation which effectively wipes out 100% of audio when 2 sounds of the exact same frequency are played out of phase with each other.
The phase cancellation method works pretty well for the lower end of the audio spectrum and things such as road and tire noise in a vehicle. Higher frequency noises which have a shorter wave length still depend on the use of soundproofing. Phase cancellation is still possible at higher frequencies but the amount of equipment required to make it work in a pair of headphones is just not feasible.
We’re not there yet
Noise-cancellation technology is still developing so we will see it used more and more in our everyday products. Current drawbacks are power requirements needed for the analyzing and processing of the ambient audio. This typically means a 9volt battery is needed for headphones. Some users also experience a high frequency hiss which comes from the noise cancellation frequency. Audible noise can commonly be attributed to the quality of electronics used in the noise cancelling product.
As technology continues to improve and chip-sets get smaller, we will see a growth in this segment of the headphone market. Eventually, Noise cancelling technology will be standard in headphones, vehicles, and office buildings.
Preparing Files for Multi Studio Use
When traveling around between studios or taking your home recorded project to a professional studio to be mixed or mastered there are a few things that you should consider prior to booking your appointment. You’ll need to make sure your hard drive is compatible with the studio computers and your DAW session file is readable by the studio’s system. Many audio software programs such as ProTools routinely change their file type and the newest format may not be available when you get there. Furthermore, organization is key in a good workflow and if your new engineer has to spend time getting all the files aligned he might lose the vibe of the song or maybe the session altogether. I have also seen countless hours of valuable recording time wasted on re-consolidating files, searching for bounced files, and missing plugins. Here are a few tips to keep your session flowing. If you are also tracking instruments be sure to properly prepare for your recording session.
Call ahead
Call your studio ahead of time to see what the best way to get files to them is. Many recording studios provide a checklist or “todo” list for new clients or for session files that are inbound.
Check Software Version
DAW users may need to save their session as an earlier format. For ProTools this can be done by performing a “Save Copy As” and then choose the version needed. You will only be able to change to the formats supported by your version of ProTools. Make sure you check the “All Audio Files” box.
Sample Rates and Audio Formats
Request the studio’s preferred sample rate. This is more critical with audio for film and television. If necessary you may need to do a conversion of you audio files. Most studios can handle 96K sample rate at 24bit. It is unlikely that a home user would be using something larger than a 48k session but check with you engineer to be certain
Consolidation of Audio Files
If you are using a different DAW than the studio then all audio tracks (regions/clips) need to be
consolidated with no edits and have the same start time (00:00:00). Export these new files as .AIFF or .WAV in the highest resolution possible and then label accordingly. Do NOT make an MP3 of these files and send to your engineer. You should keep these files at highest audio fidelity possible. Consolidating files makes it easy for your studio engineer to drop the entire audio files into a new session. If they all have the same start time everything will line up perfectly.
Preserve Plugins and Effects
If the sound you’re getting from a plugin or effect is vital to the song you should print the
effected audio to another audio track so it can be recreated without the use of the plugin. Check to see what plugins are available at the studio. Some plugins may not load but preserving the finalized audio into a track of it’s own will allow for that sound to always be recalled.
Preserve Virtual Instruments and MIDI Data
Virtual instruments including any audio coming from programs that are rewired such as Reason should also be printed and consolidated to a new audio track. MIDI information for instruments is important to retain in the event that sound replacement needs to be done. It’s also likely the studio will have high quality virtual instruments so maintaining MIDI data from home would be a good idea.
Make a Working Copy “Save As”
Make a copy of the session file for your new engineer to work with. I like to suggest a new session with just consolidated audio and takes that you need to work with. If necessary, your engineer can go back to an older session copy to re-print an instrument or find another take of a track. You also want to make sure you are preserving your file from time to time. Make a copy on a disc and put it in a save place.
Preserve Tempo and Click Tracks
Provide information regarding the BPMs (beats per minute) of all songs if recorded with a click/metronome. Having general notes like this for any song is a good idea. I usually recommend that click tracks are printed to an audio file once the final take of the song is recorded and all timing adjustments are locked in. This ensures a copy of the timing and click are always available in case something goes wrong with the grid or tempo of the session.
Hard Drive Formatting and Transferring
If you plan to work directly off your hard drive be sure to check what file system you should be using. Taking a MAC formatted drive to a PC based studio will not be usable. Also be sure to ask about connectivity for drives. Firewire 400/800, USB 2/3, Thunderbolt are all possible options. Optical media such as CD or DVD discs and USB flash drives are good ways to physically transfer session files but will require being placed onto another hard drive to work from. Your studio may provide a hard drive so it’s best to clarify with them first.
Organize
Make the proper notes for your sessions and songs. The ProTools comment box is a useful tool for making quick tidbits about that specific tracks. I like to include a simple .txt document within my session folder that has basic information such as recording dates, microphones used, external processing, tempo etc. Nowadays I also attach digital photos if I feel necessary. Providing a lyric sheet is very useful for your engineer and producer when recording vocals and mixing.
Deliver Early
Send your files ahead of time if your studio allows it. This will give your producer or engineer a chance to look at the session saving you valuable time later on. Fixing problems before you get to the studio will save you the headache and a ton of cash. There’s a good chance the engineer will not charge you anything just to check things over. After all, it will save them the headache of fixing everything on the day of the session. If your files are a real mess, you might want to budget some time to allow for the organization of your files prior to tracking or mixing your sessions.
